How To Configure PowerBI Template for Octopus Deploy Local Instance Reporting
- Jeff Taylor
- Jun 3, 2020
- 1 min read
Click here to download the SQL Server PowerBI Template -
Once you have downloaded the OctopusDeploySQLServer template, open it up.
You will see PowerBI attempt to refresh the data, you will see the pop-up below, click 'Close'.

Now from the 'Home' bar, click 'Transform data' and select 'Data source settings'

Click on 'Change Source...'..

Enter in your local SQL Server name and instance if needed, and enter your database name, then click 'Ok'.

Now you should see your server and database listed, next click on 'Edit Permissions...'.

Now under Credentials, click 'Edit...'. If you notice the current type is 'Database'.

If you are going to connect using SQL Server database user account, select 'database' then enter your username and password and click 'Save'.

If you use Windows Authentication, select 'Windows' and select either 'Use my current credentials' or enter 'alternate credentials' and click 'Save'.

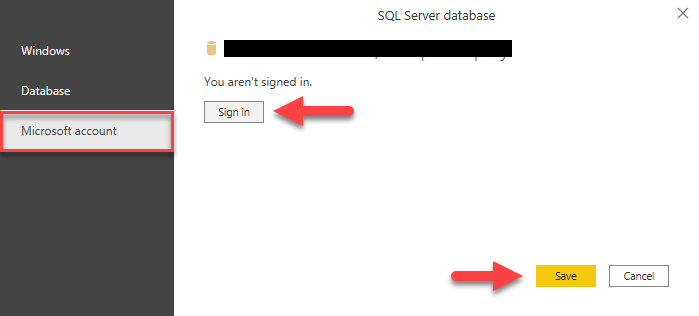
If your instance uses a Microsoft account, then select that option and click 'Sign In' and follow the prompts and then hit save.
Once you save your credentials, click 'Ok', then on the 'Home' bar, click 'Refresh' to connect to your database and refresh your data.

Thanks for sharing this detailed walkthrough on configuring the PowerBI template for Octopus Deploy! It’s really helpful to have step-by-step instructions, especially when working with SQL Server connections. Setting up the right data source and credentials can sometimes be tricky, but this guide makes it clear and straightforward. I appreciate the inclusion of options for different authentication methods, too. It’s great to know that no matter how your server is set up, you’ve got a way to get the data flowing into PowerBI. Looking forward to seeing how this improves our reporting setup!
It looks like it could be a data or relationship issue. It says the one table sees a duplicate value, so it could be how your table is setup. You might need to remove or change the PowerBI relationship to that table or see what duplicate data exists.
After following these directions and setting up a DB connection, there are numerous errors displayed: DeploymentHistory
The syntax for ')' is incorrect. (DAX( DIVIDE(COUNT(DeploymentHistory[DeploymentId),CALCULATE(COUNT(DeploymentHistory[DeploymentId]),ALLEXCEPT(DeploymentHistory,DeploymentHistory[EnvironmentName]))) )).
DeploymentHistoryGroup
Load was cancelled by an error in loading a previous table.
DeploymentHistoryDev
Load was cancelled by an error in loading a previous table.
DeploymentHistoryQA
Column 'Count' in Table 'DeploymentHistoryQA' contains a duplicate value '1' and this is not allowed for columns on the one side of a many-to-one relationship or for columns that are used as the primary key of a table.
DeploymentHistoryProd
OLE DB or ODBC error: Exception from HRESULT: 0x80040E4E. An unexpected exception occurred.
QAAndDev
OLE DB or ODBC error: Exception from HRESULT: 0x80040E4E. An unexpected exception occurred.
IssuesFoundInEnvironments
OLE DB or ODBC…